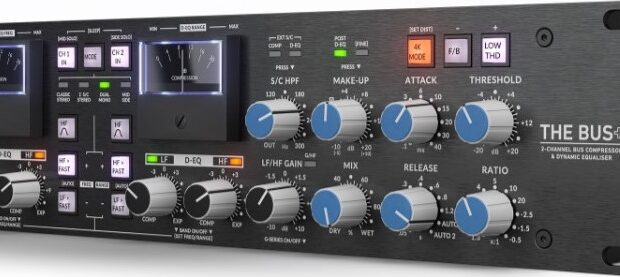
For the first time, SSL has introduced on The Bus+ a two-band dynamic equaliser created in analogue, programmable in frequency and range. Ready to go further?
The D-EQ is a two-band equaliser that only apparently has a few functions. Let's start by saying that it is placed by default after the Make Up Gain, which in these conditions also sets the input level, and is also dependent on the Mix control. The D-EQ can be used without the need to activate the compressor: to do so, simply move the compressor intervention threshold to +20.
However, it is possible to change the order and advance the D-EQ in front of the compressor by pressing Make-Up and selecting Post D-EQ. In this case, the D-EQ is freed from the dependency of Make-Up Gain and Mix. This is the ideal condition for using only the D-EQ without a compressor and, above all, making sure that additional harmonic distortion is added when the signal is processed by the compressor.
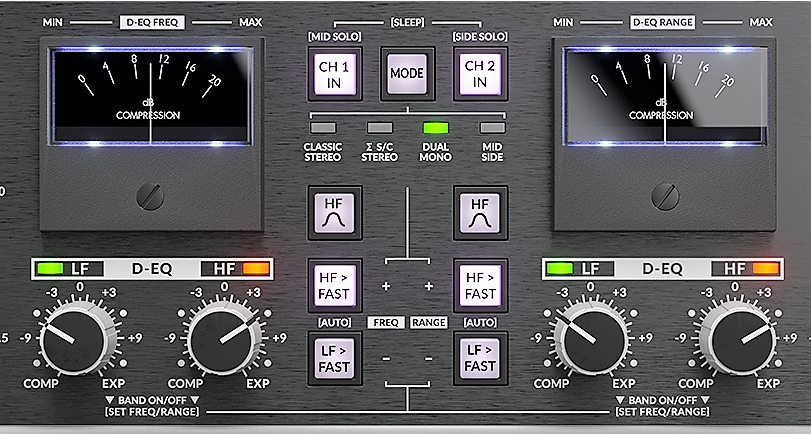
The two bands, LF and HF, are independent per channel and to activate them simply press the LF and LF knobs for a few moments. Confirmation of activation is provided by the backlighting of the buttons on the side.
The controls
The control for each band allows you to move towards compression, left, or towards dynamic expansion, the latter function present on very few compressors, such as the Barth Dynaset, which also includes the function to limit expansion within a programmable dB value, exactly as happens with our SSL The Bus+!
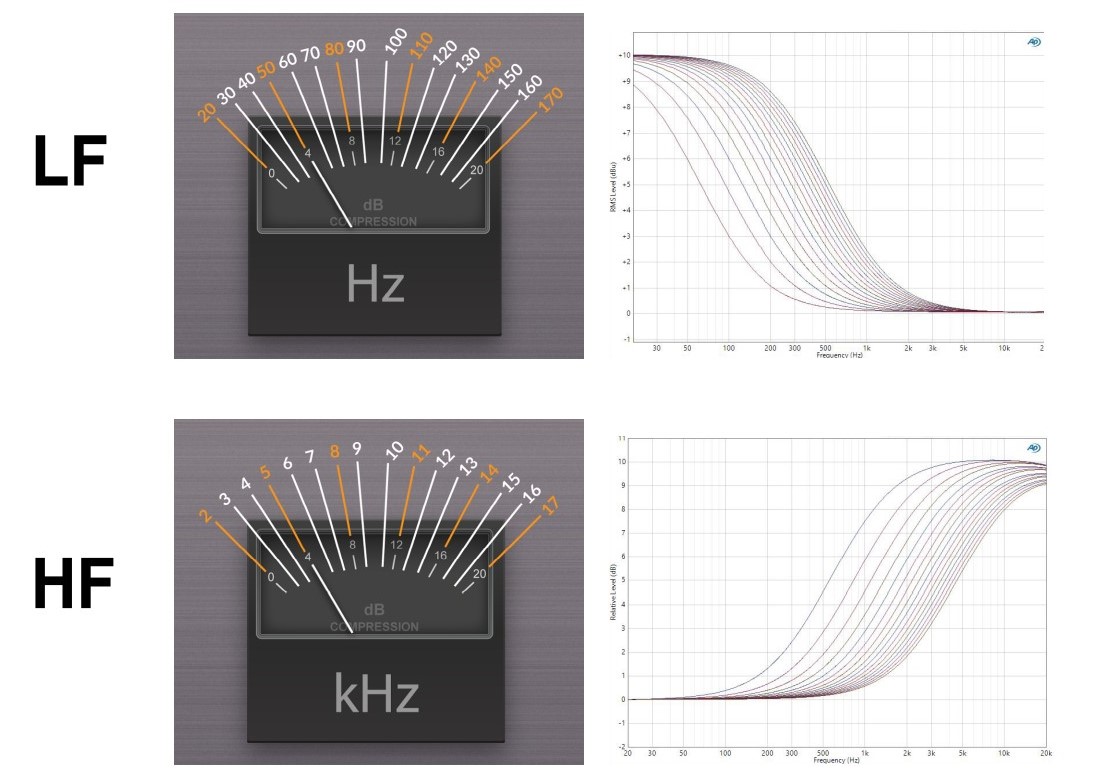
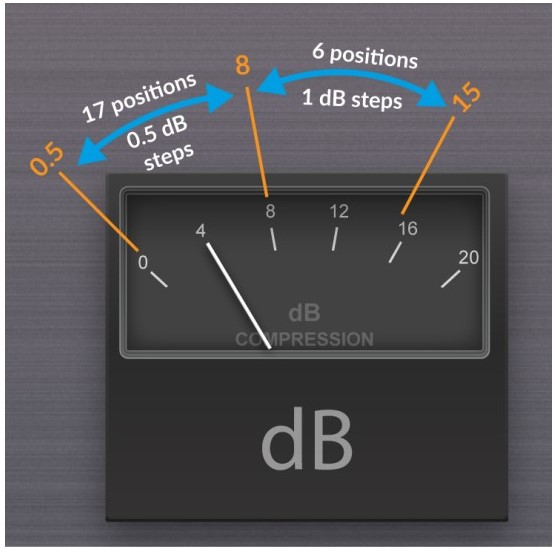
The programming of frequencies and dynamic range (which technically corresponds to a limiting applied on the sidechain signal) is disarmingly simple: you hold down the LF or HF knob for the channel for a few moments longer and the two VU meters become the monitors for setting the parameters.
Using the HF>Fast and LF>Fast buttons on the left sets the frequency for the two bands, while using those on the right defines the dynamic range. Limiting the range is very important when it comes to expansion: if the value is very wide, you run the risk of exploding the transient with bad musical effects. By keeping a range of e.g. 4 dB, everything remains controlled and there are no surprises.
Programming is very convenient: the frequency change, for example, is in real time as is the range: by setting Mix to Wet and increasing the Make Up Gain you can hear live what you are doing. Furthermore, by pressing the CH1 and CH2 In buttons, you can listen to the original signal, putting the channel in Bypass, or the Solo, very conveniently in Mid/Side for the two channels, by holding down the corresponding CH In button for a longer time.
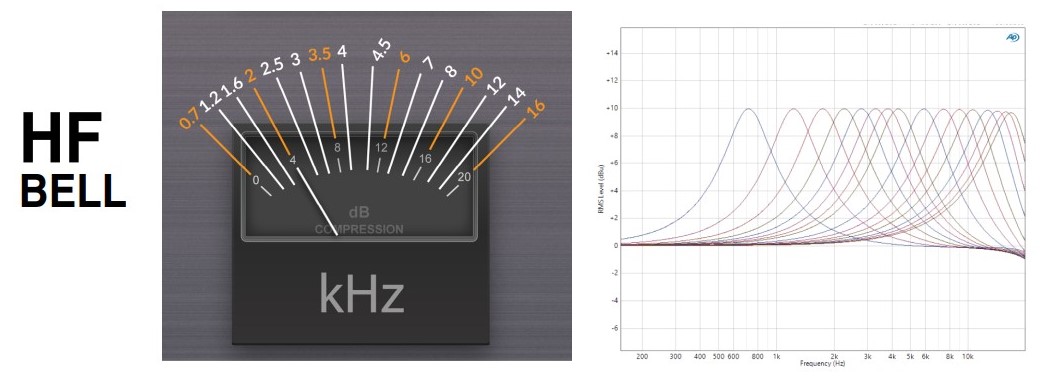
There are also other options: HF Bell changes the behaviour of the HF dynamic filter from Shelf to Bell and, for this too, you can choose the frequency as for normal mode.
For the HF band, you can change the times from 3ms to 1 ms by activating HF Fast. The release times are always fixed at 50 ms. There is a third possibility, holding down HF Fast longer, which lights up purple, for attack times of 10 ms and release on Auto. For cymbals this is perhaps the most interesting mode of the three, as it improves transient perception by lengthening the envelope.
The same modes are provided for the LF band but with different times: in default conditions 30 ms attack and 100 ms release, with LF>Fast 10 ms attack and 50 ms release, and holding the button down longer 10 ms attack and Auto for release. The initial conditions are ideal for handling the bass.
There is an unknown detail about the LED that lights up when compression or expansion comes into action: its activation is independent of the frequency it receives. It can therefore happen to work and see it active even when it is not compressing or expanding anything. For example, if you define 5 kHz as the HF frequency, the LED will light up even if a 20 Hz sine wave enters. Furthermore, the D-EQ trigger is directly dependent on the Make Up Gain level if the dynamic eq is placed before the compressor. Especially for HF, if you set high frequencies that have a low overall level, the LED may light up but the dynamic eq is not actually working. And how is it working? The expansion is interesting: the higher you raise the frequency from the selected point, the more the expansion works by increasing the gain. Basically it behaves like a shelving filter, except that its work depends on a dynamic process and not on equalisation.
Some rules can be deduced from this:
- the frequencies higher than the selected one are the ones that suffer an increase in level, with a relative effect on the overall timbre
- the colour of the LED does not really correlate with the dynamic process at the selected frequencies. In a complex signal, such as that of a song, it is necessary to go by ear and not rely too much on the led
- It is necessary to work with the Make Up gain, which works as a threshold as well as a level, when the dynamic eq is pre-compressor
- In the case of post-compressor D-EQ, it is the Mix level that determines the threshold, while the Make Up control has no function.
LF Gain, the standard shelving
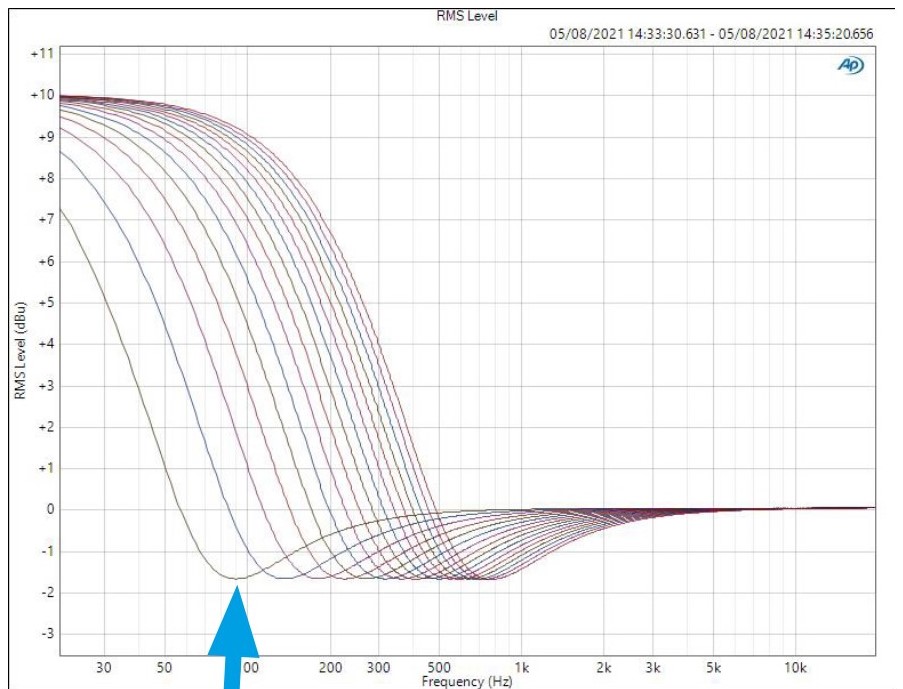
In Classic Stereo and S/C Stereo modes, SSL The Bus+ also includes two shelving filters for LF and HF, the standard. LF Gain, located on the left, is a shelf filter that controls the amount of low frequencies after the LF D-EQ filter, with a range of +/- 10 dB. Its frequency depends on the frequency set for LF and can only be used if the band is switched on. There is a second option for the type of filter used for LF Gain: holding down LF Gain activates the green LED indicating that the G-Series mode has been selected, which has an overshoot equalisation curve that is the trademark of G-Series consoles. In terms of results, the two curves have very different results. Without G-Series activated, the LF band behaves more gently being a simple shelf filter at 6 dB/Oct, while with G-Series activated you find yourself with the selected band showing more selective equalisation by having a 12 dB/Oct slope and overshoot.
In terms of use, for wider and less obvious interventions with positive gain it is better to use the default curve, while for greater precision on a narrower band with negative gain it is better to switch to G-Series. To understand how they sound, you can select the higher frequency for LF: the effect is evident between the two possibilities on midrange behaviour.
The LF band, beyond a simple bass eq, becomes interesting combined with D-EQ, because dynamic eq with 4K Mode switched on adds harmonic distortion and the LF shelf allows the dynamic eq to be rebalanced to rebalance the bass but keeping the harmonic distortion from the dynamic eq.
The easiest application is to use LF band compression and then raise the LF band gain, with the frequency set around 70 Hz and G-Series mode switched on. For example, with LF D-EQ you go down to -9 and with LF Gain you go up to around +4.5, or even more, with G Series activated. This creates more space between the kick drum and bass and the mid-bass and also gives you more space. As always, you have to experiment, but there is no doubt that the G Series mode is the one we have heard on thousands of rock, hip hop and pop tracks from the late 80s and especially the 90s!
HF Gain
As with the LF Gain shelf band, HF Gain behaves in the same way, but becomes interesting when used to correct with negative gain equalisation. In this case it becomes useful to activate Bell mode and parallel mode for the mix, using D-EQ. The Bell filter has a proportional Q design with a maximum of 1.87 at +/-10dB.
For example, to clean around the midrange, you set the HF filter to Bell and at 0.7 kHz, i.e. the lower limit, you activate the HF band. At this point, in Classic or S/C Stereo mode only, the LF Gain band on the right turns into the HF Gain control, with LED in red. Since we want to use compression, we set the dynamic range to maximum (see above), activate D-EQ and compress around -4.5 dB, with HF Gain around +1.5. With the Mix control, even only at 20, we balance the amount of work on the midrange. For this type of equalisation we want to achieve, the D-EQ should be placed post-compressor, by pressing the Make Up button on the left. Vocals and everything in the mid-high range will tend to come forward in the mix with much more definition but without causing unwanted effects. To push instruments such as electric guitars and vocals even further out, 4K mode will be activated. And that's it!
There is one limitation using LF and HF: when mastering, the two channels are not perfectly aligned on frequency and gain: we measured a difference of about one dB and a deviation of about 40 Hz when selecting the lower band of HF, at maximum positive and negative gain. It is a pity that there was no option to use a Bell filter for the LF band as well.
Listen to what you are doing
- Put the channel you are programming into Solo, by holding down the CH In button longer, which will turn green and flash
- Switch Mix to Wet. If you have chosen parallel compression, the mode LED will start flashing orange to indicate that you are only listening to the effect on the channel
- To listen only to the D-EQ, move the compression threshold to +20 so that it does not trigger if the D-EQ is placed after the compressor
- Deactivate the band of the D-EQ that you do not want to listen to; it always remains active even when programming the other band
- In the case of the HF band, Bell mode must be activated first if you want to intervene with the D-EQ on a specific band
- Enter band programming by pressing and holding down the knob until the backlights of the two VU Meters flash
- Change the frequency with the HF>Fast and LF>Fast buttons on the left and change the compression or expansion
- To return to normal conditions, press and hold the band knob to programme until normal operating conditions are restored.
D-EQ and 4K mode
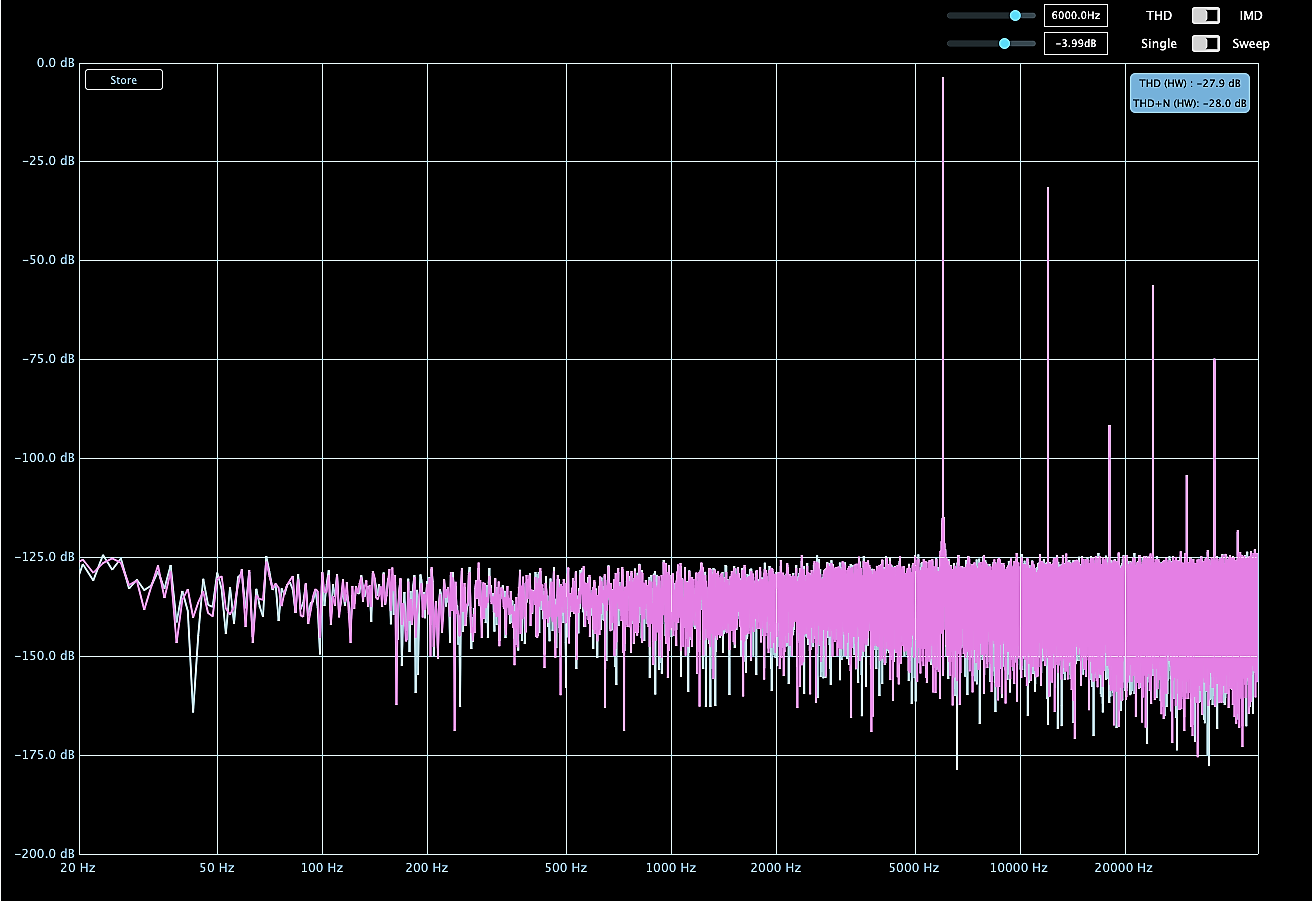
In itself the D-EQ is a dynamic processor and as such introduces harmonic distortion, but only at very high levels of expansion and compression, without being so high as to have a major impact on RMS. What it doesn't say in the manual is the possibility of using the 4K mode to significantly increase the harmonic distortion introduced and, at the same time, also modify the behaviour of attack and release.
The effect can be appreciated when the 4K distortion is particularly high. To change the distortion level of the 4K mode, simply hold 4K Mode for a while and then select the amount of harmonic distortion with the Low THD and F/B buttons.
On the Mono channel or in stereo mode, the D-EQ takes on personality with a value around 6, i.e. with the orange 4K Mode button. Using it in Mid/Side, the choice is always very personal and, rightly, you can also choose on the Side channel the amount of harmonic distortion for 4K Mode. Feedback Mode does not affect the work of the De-EQ as does Low THD.
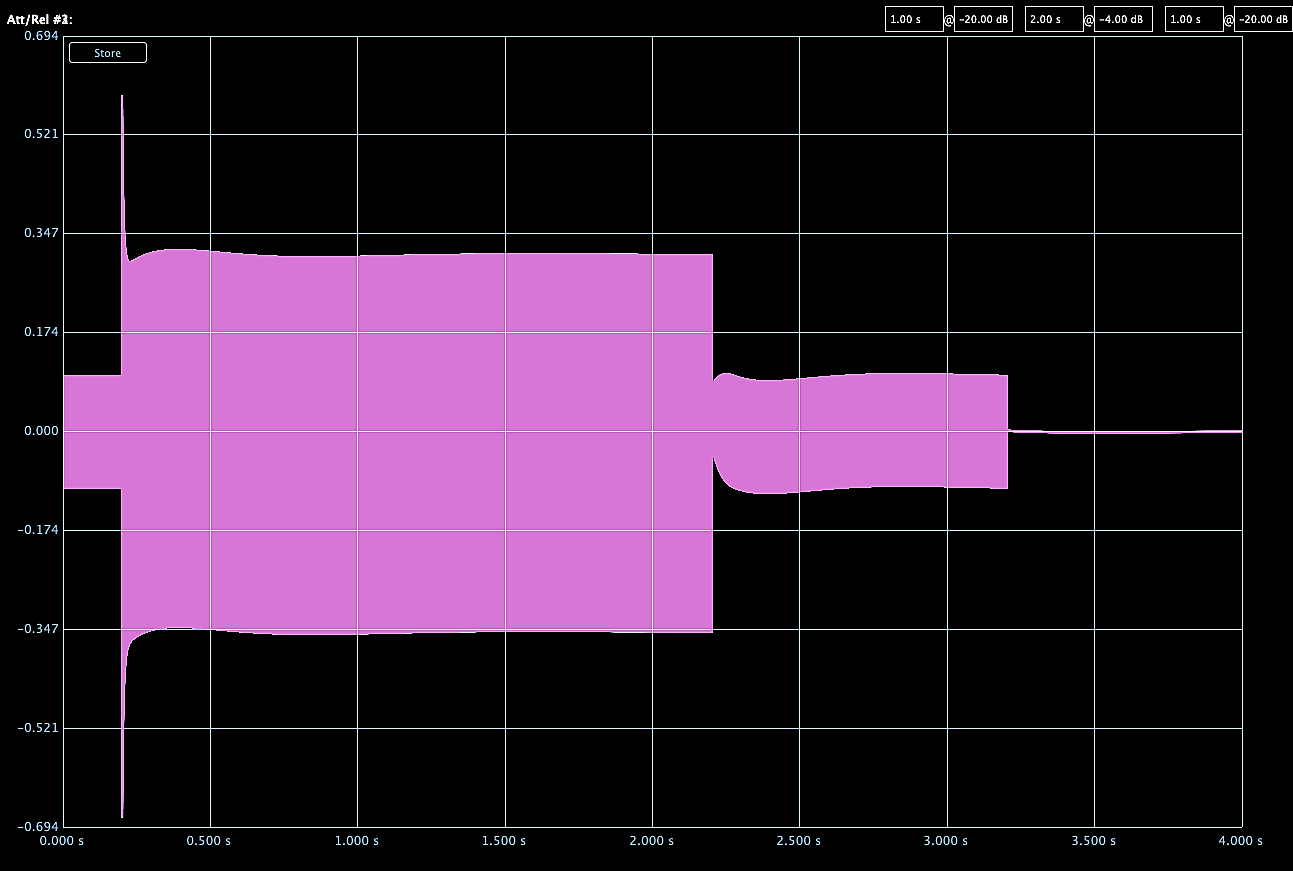
Increasing the value of 4K also unbalances the compressor, which will have an attack and release phase typical of an inaccurate circuit, but this effect is also interesting as a secret weapon for having your own personal compression.
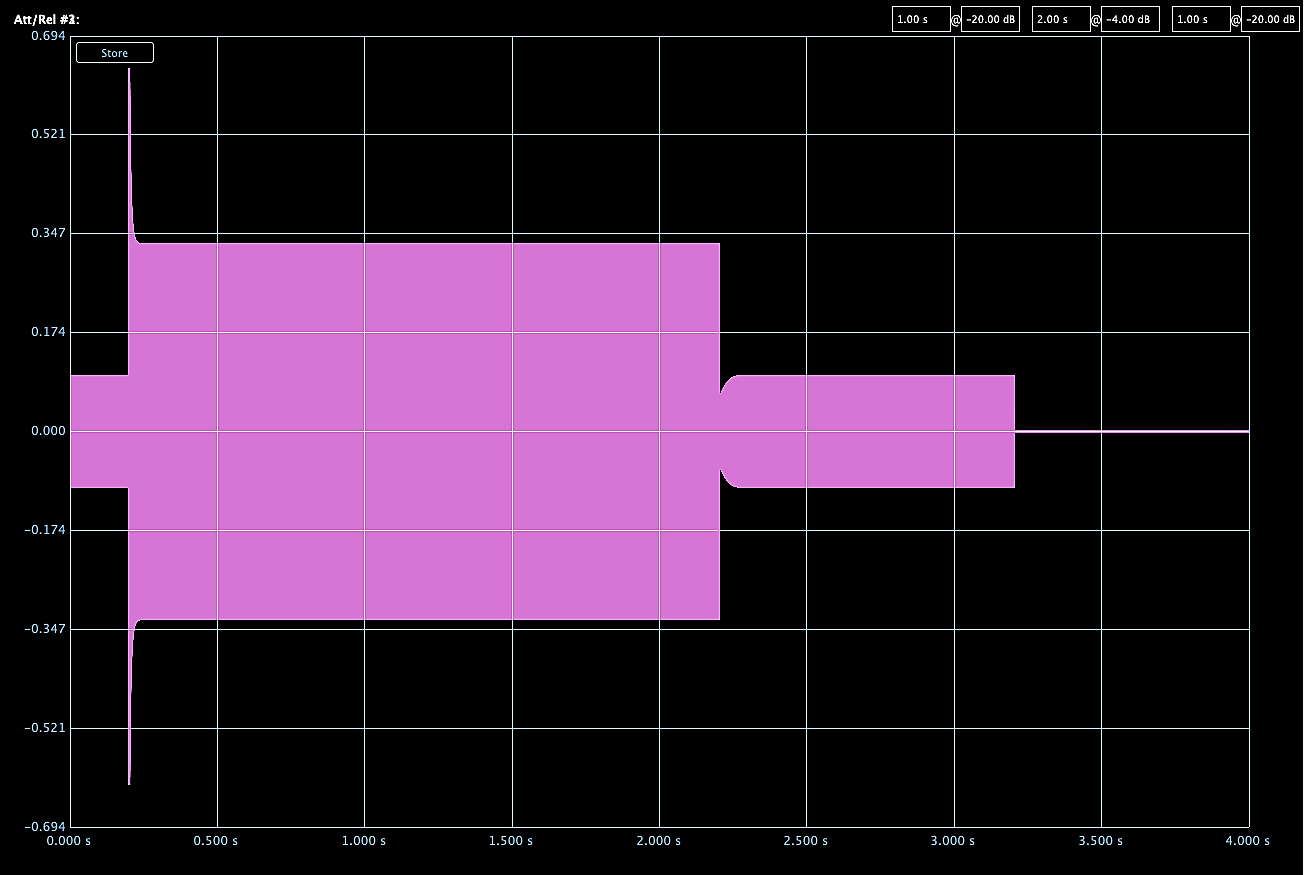
As can be seen from the envelope image above, high levels of 4K mode unbalance the system, making the attack and release phase different, which under normal conditions (without 4K activated) can be seen in the image below.
Conclusions
D-EQ is not only corrective, but also includes the benefits of dynamic processing that introduces distortion. We had already seen how the negative compression mode was useful for transients but also for final equalisation. The D-EQ has an extra edge, both in compression and expansion, enriching the timbre and keeping the phase correlation intact. The two ancillary HF and LF bands, on the other hand, are much more standard and, in our opinion, even less sonically interesting.
SSL The Bus+ still has more surprises to discover. In the meantime, let's enjoy an analogue dynamic processor that has an extremely low noise threshold, thanks to its SMD components and perfect coupling with its power supply. In the last tutorial we will put together all the elements to transform an SSL The Bus+ into a unique tone processor with inimitable results.
Read also this tutorial about The Bus+ by Luca Pilla:
Solid State Logic The Bus+: How to manage Negative Compression


